
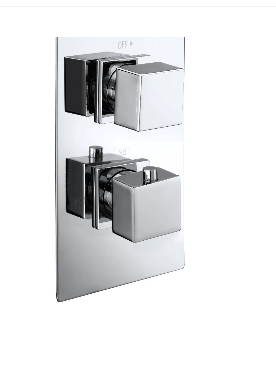
How to Install a Thermostatic Shower Valve Safely
A thermostatic shower valve is a smart addition to any bathroom, as it keeps the water temperature steady, preventing sudden spikes that can cause burns. Installing one safely requires careful planning, the right tools, and attention to detail. Unlike regular shower valves, which only control water flow, thermostatic valves have a built-in mechanism that balances hot and cold water, making proper installation crucial for both functionality and safety. Below is a step-by-step guide to help you install a thermostatic shower valve safely.
Gather Tools and Materials
Before starting, make sure you have all the tools and materials needed. This avoids delays and ensures you can work safely without rushing to find missing items.
Tools:
- Adjustable wrench (to tighten connections)
- Pipe cutter (to cut pipes to the right length)
- Screwdriver (both flathead and Phillips, for removing covers and screws)
- Tape measure (to check distances between pipes)
- Level (to ensure the valve is straight)
- Plumber’s tape (to seal pipe threads and prevent leaks)
- Pipe deburrer (to smooth rough edges on cut pipes, reducing the risk of leaks)
- Torque wrench (optional, but helpful for tightening connections to the right pressure)
Materials:
- Thermostatic shower valve (check that it’s compatible with your plumbing system—most work with standard ½-inch copper or PEX pipes)
- Adapter fittings (if your pipes are a different size than the valve)
- Shut-off valves (to turn off water to the shower during installation)
- Escutcheon plate (the cover that hides the valve and pipes, matching your bathroom style)
- Silicone caulk (to seal the escutcheon plate and prevent water from seeping behind walls)
Always check the manufacturer’s instructions for any special tools or parts specific to your valve model.
Turn Off the Water Supply
Working with water on is dangerous and can cause flooding. Follow these steps to turn off the water safely:
- Locate the main water shut-off valve for your home. It’s usually in the basement, garage, or near the water meter. Turn it clockwise until it’s fully closed.
- Open all the faucets in your home (sinks, tubs) to drain any remaining water in the pipes. This reduces pressure and prevents water from spilling when you disconnect pipes.
- Check if your shower has its own shut-off valves (common in newer homes). These are usually near the shower, behind an access panel in the wall. If present, close them instead of the main valve—this keeps water on in the rest of the house.
- Test that the water is off by turning on the shower. No water should come out. If water still flows, double-check the shut-off valves and close them tighter.
Never skip this step. Even a small amount of water pressure can make pipes spray when disconnected, causing water damage or slips.
Prepare the Installation Area
The thermostatic shower valve is installed inside the wall, so you need access to the plumbing pipes. If you’re replacing an old valve, you may already have an access panel. If not, you’ll need to create one (or work through the shower opening if the wall is open, like during a renovation).
- Remove the old shower valve (if replacing). Use a wrench to disconnect the hot and cold water pipes from the old valve. Unscrew the valve from the wall brackets and pull it out.
- Clean the pipes. Use a pipe brush to remove rust, debris, or old plumber’s tape from the pipe ends. This ensures a tight seal with the new valve.
- Check the pipe alignment. The hot and cold water pipes should be straight and at the correct distance apart (usually 8 inches from center to center, but check your valve’s instructions). If they’re crooked, use a pipe cutter to trim them, then straighten with a pipe bender (for copper pipes) or replace a section (for PEX).
- Mark the position for the new valve. Hold the thermostatic shower valve against the wall and mark where the screws will go to secure it. Use a level to ensure the valve is straight—an uneven valve can cause the handle to stick or the temperature mechanism to work poorly.
If you’re installing a new valve in a new wall, make sure the wall studs are spaced to allow room for the valve. Most valves need at least 3 inches of space on all sides to fit properly.
Install the Thermostatic Shower Valve
Now it’s time to fit the valve into place. Take your time to ensure connections are tight and aligned correctly.
- Apply plumber’s tape to the pipe threads. Wrap it clockwise around the threads 2–3 times—this creates a seal that prevents leaks. Don’t wrap too much, as excess tape can block water flow.
- Connect the hot and cold pipes to the valve. The valve will have labels (H for hot, C for cold) to guide you. Use an adjustable wrench to tighten the connections—turn them clockwise until snug, but don’t over-tighten (this can crack the valve or pipes).
- Secure the valve to the wall. Use the screws provided with the valve to attach it to the wall brackets or studs. Make sure it’s tight—no wiggling. A loose valve can vibrate when water flows, causing leaks over time.
- Install the escutcheon plate (if needed). This plate covers the hole in the wall around the valve. Slide it over the valve stem and press it against the wall. Don’t secure it fully yet—you’ll need to adjust it after testing for leaks.
For PEX pipes, use crimp rings or push-fit fittings (as per the valve’s instructions). For copper pipes, sweat-solder the connections (only if you have experience—solder can damage plastic parts of the valve, so wrap them in a wet cloth first).
Test for Leaks
Before closing the wall or installing the handle, test the valve to check for leaks. This step is critical—catching a leak early avoids costly repairs later.
- Turn the water supply back on (slowly). Open the main shut-off valve or shower shut-off valves a little at a time to let water fill the pipes gradually. This reduces pressure spikes that can damage the valve.
- Check all connections. Look for drips around the hot and cold pipe joints, the valve body, and where the valve meets the wall. Even a small drip means a loose connection—turn off the water, tighten the fitting, and test again.
- Test the valve’s functionality. Turn the shower handle to the “on” position. The water should flow smoothly. Adjust the temperature dial—turning it to hot should increase warmth, turning to cold should cool the water, with no sudden jumps.
- Check for leaks again after 10 minutes. Sometimes leaks start slowly, so let the water run for a few minutes and inspect once more.
If you find a leak you can’t fix, turn off the water and check if the pipes are aligned correctly or if the plumber’s tape is applied properly. Never ignore a leak—water behind walls can cause mold or rot.
Install the Handle and Escutcheon Plate
Once you’re sure there are no leaks, finish the installation with the handle and escutcheon plate.
- Attach the valve cartridge (if separate). Some thermostatic shower valves have a removable cartridge that controls temperature. Slide it into the valve body and secure it with the provided clip or screw (follow the manufacturer’s steps—incorrect installation can break the cartridge).
- Install the handle. Slide the handle onto the valve stem and tighten the set screw (usually with a small Allen wrench). Make sure the handle turns smoothly—if it sticks, the valve may be misaligned, so loosen it and adjust the valve position slightly.
- Secure the escutcheon plate. Apply a thin bead of silicone caulk around the back of the plate (this seals out water). Press it against the wall and screw it into place. Wipe away excess caulk with a damp cloth before it dries.
Let the caulk dry for 24 hours before using the shower. This ensures a tight seal that prevents water from getting behind the wall.
Final Checks and Safety Tips
After installation, take a few extra steps to ensure the valve works safely and efficiently.
- Test the temperature limit. Most thermostatic shower valves let you set a maximum temperature (usually 120°F/49°C) to prevent burns. Follow the manufacturer’s instructions to adjust this—turn the limit stop screw until the handle won’t go past the safe temperature.
- Clean up the area. Dispose of old parts, tools, and packaging. If you cut a hole in the wall for access, patch it with drywall and paint to match.
- Label hot and cold pipes. Use tape or markers to label which pipe is hot and which is cold near the valve. This helps if you need to repair or replace parts later.
- Keep the manufacturer’s instructions. Store them in a safe place—they include troubleshooting tips and warranty information.
Never use the shower until you’re sure the valve works correctly. Sudden temperature changes after installation could mean a misconnection (hot and cold pipes swapped), which is dangerous.
FAQ
What happens if I connect hot and cold pipes backwards?
The valve will mix water incorrectly, causing the temperature to spike when you turn the handle to “cold” or stay cold when you turn to “hot.” This is unsafe—turn off the water, swap the connections, and retest.
Can I install a thermostatic shower valve in a wall with no access panel?
It’s not recommended. Without an access panel, you can’t fix leaks or adjust the valve later without cutting a hole in the wall. Always install an access panel (even a small one) behind the valve.
Do I need a professional to install it?
If you have experience with plumbing (cutting pipes, using wrenches, soldering), you can do it yourself. If not, hire a licensed plumber—incorrect installation can cause leaks, burns, or damage to the valve.
How long does installation take?
For replacing an old valve, 2–3 hours. For new installations (with wall work), 4–6 hours. Rushing increases the risk of mistakes, so take your time.
Why is my thermostatic valve not keeping a steady temperature?
This could mean loose connections, a dirty cartridge (from debris in pipes), or incorrect installation (valve not straight). Turn off the water, check connections, clean the cartridge, and ensure the valve is level.