How Thermostatic Shower Valves Work
Key Components and Their Functions
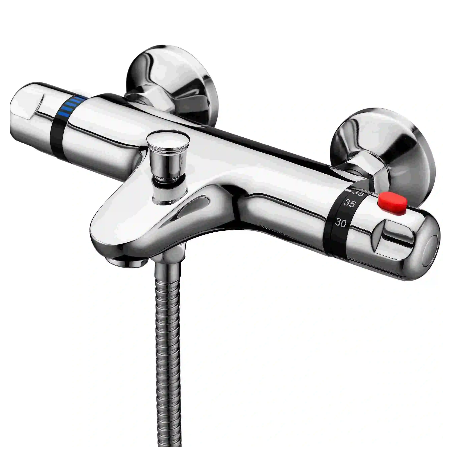
Thermostatic shower valves are made up of several key components: the valve body, the thermostatic cartridge, and the temperature control lever. These parts work in unison to regulate the water flow and temperature, ensuring a consistent shower experience. Let's delve into the function of each component:
- Valve Body: This component houses the internal mechanisms and plumbing connections. It's typically constructed from durable materials like brass or plastic to withstand the constant exposure to water and varying temperatures. The design and quality of the valve body are crucial for efficient water distribution.
- Thermostatic Cartridge: Often considered the heart of the system, this component is sensitive to temperature changes. It operates by expanding or contracting in response to the water temperature, thereby maintaining a steady output and ensuring user comfort.
- Temperature Control Lever: This user-interface component allows individuals to set their preferred water temperature. By communicating with the valve body and cartridge, it adjusts the water flow to match the user's temperature setting, enhancing the shower experience.
Temperature Control Mechanism Explained
Understanding the temperature control mechanism of thermostatic shower valves is essential for their effective use. These valves operate using the principle of thermal expansion to maintain a consistent water temperature.
- Thermostatic Valve Operation: The system reacts to water temperature fluctuations. Within the thermostatic cartridge, a specialized wax expands as water temperature rises and contracts when it cools, facilitating real-time adjustments to maintain a stable output.
- Constant Temperature Maintenance: This mechanism ensures the water temperature remains constant, even when there's a change in pressure from the hot and cold water supply lines. It provides a risk-free and enjoyable shower experience by preventing sudden temperature spikes that could cause scalding.
Research shows that thermostatic shower valves significantly reduce the scalding risk, making them especially beneficial in households with children and elderly members. By maintaining water temperatures within a safe range, these valves not only enhance convenience but also contribute to a safer home environment.
Installing Your Thermostatic Shower Valve
Tools and Materials Needed
Getting ready to install a thermostatic shower valve means gathering everything needed beforehand. Tools like a wrench, screwdriver, and some Teflon tape will come in handy, along with obviously the actual valve itself. When opening up the valve packaging, look out for extra bits that might be included – usually there are screws, maybe some mounting hardware, and definitely an installation guide somewhere in there. Access to both hot and cold water lines is essential for this job. And don't forget to grab a bucket or something similar to put under the work area; water tends to find its way everywhere when working on plumbing connections.
Step-by-Step Installation Process
To successfully install your thermostatic shower valve, follow these steps:
-
Turn Off the Water Supply:
- Begin by shutting off the water supply at the source to ensure a dry work environment.
-
Remove the Existing Valve:
- Use a wrench to remove the existing shower valve and carefully disconnect the hot and cold supply lines.
-
Install the New Valve:
- Follow the manufacturer's instructions to install the new thermostatic shower valve. Ensure that hot and cold lines are connected correctly to prevent improper mixing.
-
Seal the Connections:
- Apply Teflon tape to the threads of the supply lines for a leak-proof seal, then securely fasten the connections.
-
Attach Trim and Handle:
- Finally, install the trim and handle as per the instructions before turning the water supply back on.
After completing these steps, check for proper installation and function.
Testing for Leaks and Proper Function
After installing the thermostatic shower valve, don't forget to check everything works right and there are no leaks. First thing, turn the water back on and take a good look at all those connection points where pipes meet fittings. These spots tend to be where most leaks start. Now run the shower itself. Check if both hot and cold water come out properly when turned on. Play around with the temperature settings too. Does it respond smoothly? Any strange noises? If something seems off or water starts dripping somewhere it shouldn't, give those connections another tighten with a wrench. Sometimes adding more Teflon tape helps seal things better. Most plumbers will tell you this extra step saves headaches later on.
Operating and Adjusting Temperature Settings
Setting Your Desired Temperature
Adjusting the temperature on a thermostatic shower isn't complicated once you know where to look. Most people start by slowly moving that temperature control lever around until they find something that feels right. A lot of folks actually prefer starting low and working their way up because nobody wants to get scalded when they first turn on the water. Safety becomes really important if there are kids running around the house, so many homeowners set those max temp limits just below what could cause burns while still keeping things warm enough for comfort. Some newer models even come with preset functions that remember your favorite settings between uses. These can be super handy but honestly, reading through that tiny manual that came with the valve usually helps figure out exactly how all those buttons work together properly.
Safety Features and Overheat Protection
Thermostatic shower valves come with important safety stuff built right in so people can enjoy their showers without worrying about getting burned. Take the scald prevention system for instance it actually stops those sudden hot bursts that happen when someone turns on the tap too fast. And there's another thing called overheat protection that most models have nowadays. Basically what happens is the valve will cut off the water completely if it senses something dangerously hot going through, which adds another level of protection against burns. Knowing all this makes sense especially for households with kids or elderly folks who might not react as quickly to sudden changes in temperature. With these safety features working behind the scenes, families can feel much better knowing their bathroom routine stays safe and comfortable.
Maintenance and Troubleshooting Tips
Routine Cleaning Procedures
Keeping a thermostatic shower valve working properly means giving it some regular attention. For day to day maintenance, grab some gentle soap mixed with water and a soft cloth to give those outer parts a good wipe down. Stay away from anything too strong or scratchy since it might ruin the finish or wear off protective layers that keep things looking nice. Don't forget about the showerhead either. Check it out now and then for those annoying lime scale buildups and mineral gunk that tends to collect over time. Left unchecked, this stuff really messes with how much water comes through and throws off temperature control completely, making showers less comfortable than they should be.
Common Issues and Solutions
Thermostatic shower valves sometimes develop problems like fluctuating water temps or annoying leaks. When this happens, first look at the connections and check how the cartridge is working since those parts often cause trouble. Water temperature that jumps around usually means either replacing the cartridge or clearing something blocking the flow path. If there's a leak coming from somewhere, tighten all the fittings properly and think about putting fresh Teflon tape on them to stop the drip. Getting familiar with what goes wrong most often helps homeowners tackle fixes themselves instead of calling a plumber every time there's an issue with their bathroom setup.
FAQ
What are thermostatic shower valves?
Thermostatic shower valves are devices used to regulate water temperature and flow in showers, ensuring a consistent and safe showering experience.
How do thermostatic shower valves maintain constant temperature?
These valves utilize a thermostatic cartridge that expands or contracts in response to water temperature changes, allowing real-time adjustments to maintain a stable temperature.
Are thermostatic valves safe for households with children?
Yes, thermostatic shower valves are considered safe as they significantly reduce the risk of scalding, making them ideal for households with children and elderly members.
What tools are needed for installing a thermostatic shower valve?
Installation requires tools such as a wrench, screwdriver, Teflon tape, and possibly additional components like screws or mounting brackets specified in the installation manual.
How often should thermostatic shower valves be cleaned?
Regular cleaning is recommended to maintain functionality, using mild soap solutions and avoiding abrasive agents to prevent surface damage.